This comprehensive guide will walk you through essential steps to enhance your WordPress site, from getting indexed by Bing to structuring your content and customizing its appearance.
Part 1: Adding Your Site to Bing Search (Bing Webmaster Tools)
While the Microsoft search robot (BingBot) might eventually discover your website, especially if it’s linked from other prominent sites, however, direct registration is crucial for fast, reliable, and accurate indexing. This is precisely where the free Bing Webmaster Tools service comes in handy.
Why You Should Register Your Site with Bing Webmaster Tools
Registering offers significant advantages, including:
- 🚀 Accelerated Indexing: Instead of waiting weeks or months for Bing to find you, you can notify it about your site immediately. Consequently, new articles will also be indexed much faster.
- 🗺️ Sitemap Submission: You can directly “feed” Bing your
sitemap.xmlfile. (For WordPress, plugins like Rank Math or Yoast SEO automatically generate this file). This ensures Bing knows about all important pages on your site. - 🩺 Diagnostics & Control: The service shows you if Bing encounters any issues accessing your site, if there are crawling errors (e.g., broken links), and how the search engine “sees” your site.
- 📊 Analytics: Furthermore, you’ll gain insights into the keywords driving traffic from Bing, which pages are most popular, and your total impressions and clicks.
💡 Important Tip: Importing from Google Search Console
If you’ve already added your site to Google Search Console (which is a must for Google), Bing Webmaster Tools allows you to import all settings from there with just one click. Thus, you won’t even need to re-verify your site ownership.
Conclusion: Don’t wait for Microsoft to find you. Actively register your website with Bing Webmaster Tools to gain control over how it’s represented in Bing, Yahoo, and DuckDuckGo (all of which use the Bing index).
Official Link: https://www.bing.com/webmasters/
Part 2: Moving WordPress to the Root Directory (yoursite.com instead of yoursite.com/blog/)
Making your site accessible directly at https://yoursite.com/ is far better for both SEO and user experience.
Method 1: The Right Way – Moving WordPress to the Root (Recommended)
This method physically moves your WordPress installation, offering a cleaner URL structure.
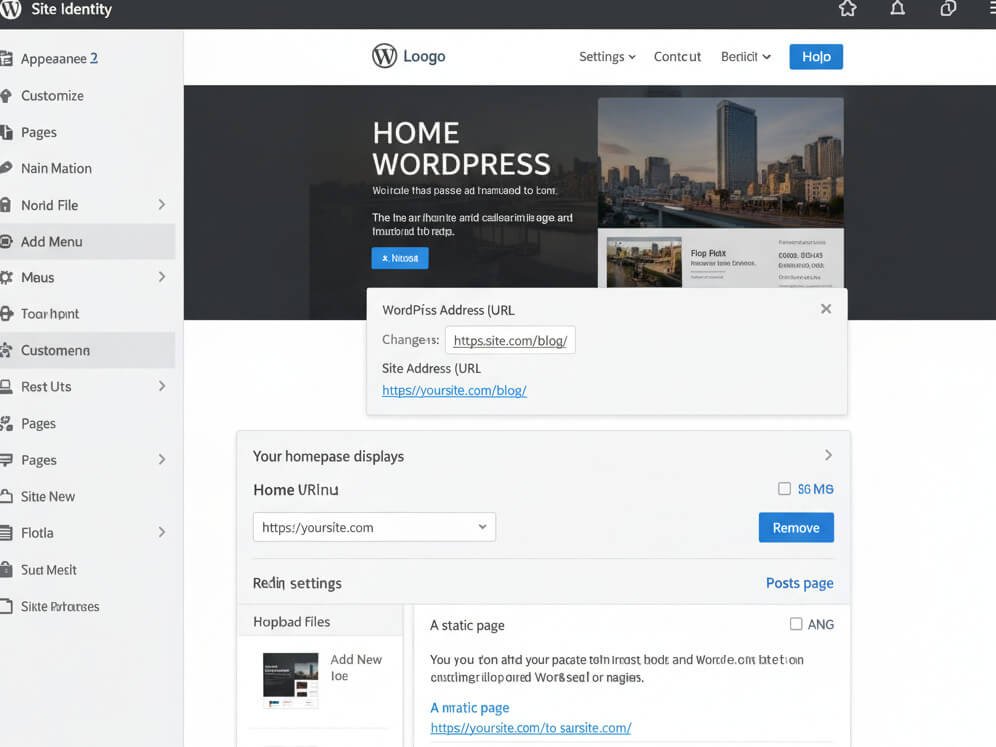
Step 1: Change URLs in WordPress
- Initially, log in to your WordPress admin panel at:
https://yoursite.com/blog/wp-admin - Next, go to Settings > General.
- Change BOTH fields to reflect your new root domain:
- WordPress Address (URL): from
https://yoursite.com/blogtohttps://yoursite.com/ - Site Address (URL): from
https://yoursite.com/blogtohttps://yoursite.com/
- WordPress Address (URL): from
- Finally, click “Save Changes”. Your site will temporarily break – this is a normal part of the process.
Step 2: Move Site Files
- First, access your hosting control panel (e.g., Hostinger hPanel).
- Then, navigate to Files > File Manager.
- Open your site’s root folder (typically
public_html). - Delete or rename any existing Hostinger placeholder file (most likely
index.html). - Enter the
/blogfolder. - Select all files and folders inside
/blog(e.g.,wp-admin,wp-content, etc.). - Use the “Move” function to relocate them one level up – specifically into the root folder (
public_html).
Step 3: Update Permalinks
- Now, access your admin panel at the new address:
https://yoursite.com/wp-admin - Go to Settings > Permalinks.
- Without making any changes, simply click the “Save Changes” button. This action will update your
.htaccessfile, ensuring the new structure functions correctly.
Your site should now correctly open at https://yoursite.com/.
Method 2: The Quick Way – Setting Up a Redirect
This alternative method doesn’t physically move any files. Instead, it automatically redirects all visitors from https://yoursite.com/ to https://yoursite.com/blog/.
- Initially, access your File Manager on Hostinger.
- Then, go to the root folder (
public_html). - Delete or rename the
index.htmlplaceholder page. - Locate the
.htaccessfile in this folder (if it doesn’t exist, you’ll need to create a new one). - Open
.htaccessfor editing and add these lines to the very top of the file:ApacheRedirect 301 / https://yoursite.com/blog/ - Finally, save the file.
Now, anyone visiting your main domain will be instantly redirected to your blog.
Which method is better? Generally speaking, the first method (moving WordPress to the root) is recommended for better SEO and long-term site architecture.
Part 3: Setting Up Your WordPress Home Page and Blog Page
Once WordPress is in the root, you’ll likely want a dedicated home page and a separate page to list your articles.
Your Next 3 Steps:
Step 1. Create a New “Home” Page
This page will serve as your site’s storefront, welcoming visitors.
- In the admin panel (now at
yoursite.com/wp-admin), go to Pages > Add New. - Name this page, for example, “Home” or “Welcome”.
- You can write some introductory text (“Welcome to Your Site…”) or simply leave it for later. Eventually, this is where you will link to your pre-landing pages and blog posts.
- Click “Publish”.
Step 2. Create an Empty “Blog” Page
This specific page is where WordPress will automatically display all your articles in chronological order.
- Go to Pages > Add New again.
- Name this page “Blog” (or “Reviews”, “Articles” – whatever you prefer).
- Important: Leave this page completely empty. Do not write anything on it.
- Click “Publish”.
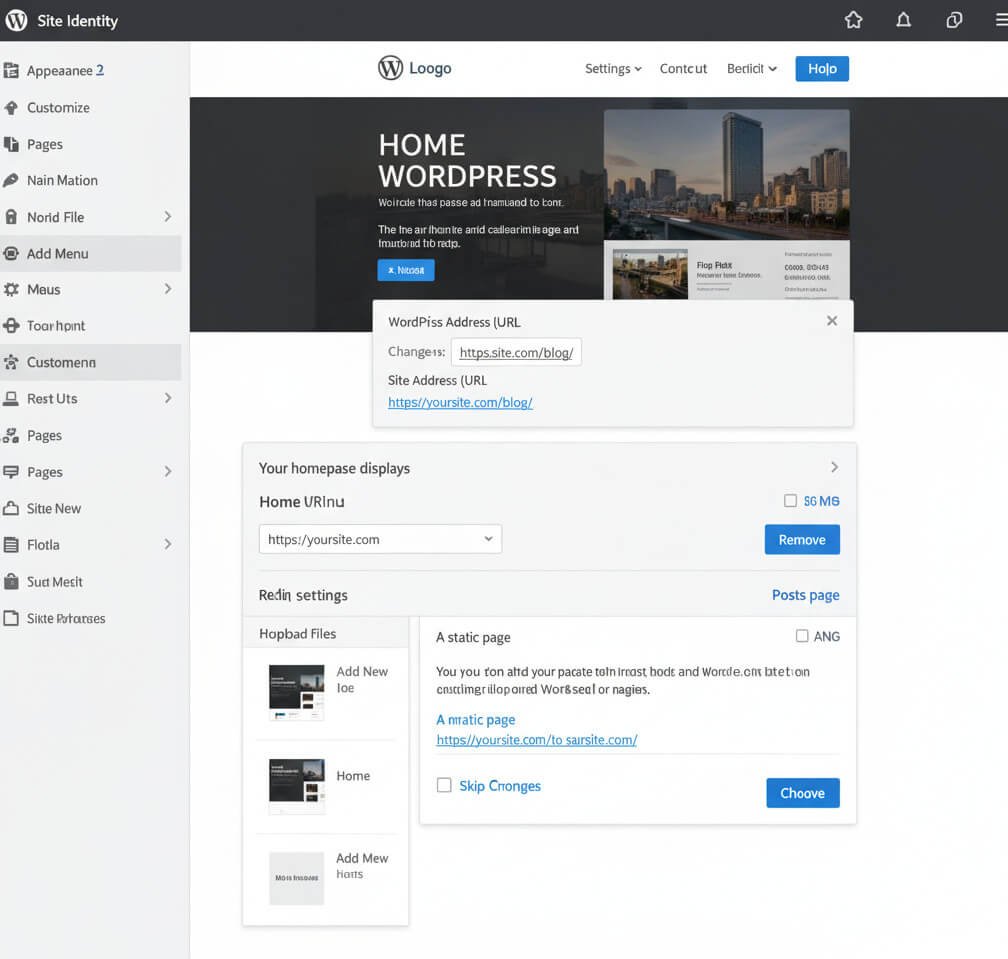
Step 3. Tell WordPress What to Display Where (Crucial)
- Navigate to Settings > Reading.
- At the top, you’ll see “Your homepage displays”:
- Select the “A static page” option.
- In the “Homepage” dropdown, select your new “Home” page (created in Step 1).
- Conversely, in the “Posts page” dropdown, select your empty “Blog” page (created in Step 2).
- Click “Save Changes”.
Result:
- Now, when someone visits
yoursite.com, they will see your new “Home” page. - Furthermore, all your articles will automatically appear at
yoursite.com/blog/(or whatever slug you gave to the Blog page).
Part 4: Fixing 403 Forbidden Error for the Blog Page
If you’ve moved WordPress from /blog/ to the root, but still get a 403 error when trying to access yoursite.com/blog/, it’s likely due to an old physical /blog folder.
Why This Happens
This error occurs because your hosting probably still has an old physical folder named /blog (from which you originally moved WordPress). When you attempt to access yoursite.com/blog/, the server detects this physical folder and tries to open it. However, since this folder is now empty (or lacks a main index.php file), the server issues a 403 Forbidden error for security reasons. Consequently, it prevents WordPress from displaying your new virtual “Posts page.”
🚀 How to Fix This (Two Steps):
Step 1: Rename (or Delete) the Old Folder
- First, access your File Manager on your Hostinger hPanel.
- Next, navigate to your site’s root folder (usually
public_html). - Locate the folder named
blog. - Ensure that you have already moved all WordPress files out of it.
- Right-click on it and select “Rename”. Change its name to something like
blog_old. (Alternatively, if you are 100% sure it’s empty and no longer needed, you can simply delete it).
Step 2: Update Permalinks (Very Important)
This crucial step will force WordPress to “rewrite” the rules for the server, ensuring correct routing.
- Log in to your WordPress admin panel (
yoursite.com/wp-admin). - Go to Settings > Permalinks.
- Do not make any changes on this page.
- Simply click the blue “Save Changes” button at the bottom of the page.
After these two steps, clear your browser’s cache (Ctrl+Shift+R or Cmd+Shift+R) and try opening https://yoursite.com/blog/ again. The 403 error should disappear, and you will see your list of articles.
Part 5: Migrating Your Pre-landing Pages to WordPress
It is highly recommended to transfer your pre-landing pages to your WordPress site for several reasons.
Why This is a Good Idea:
- Centralized Management: Everything is in one place (a single WordPress admin panel), simplifying workflow.
- Theme & Style Consistency: Pre-landing pages can utilize the same theme and design as your main site, creating a unified brand experience.
- SEO Benefits: Search engines tend to “see” content on a single domain more favorably, which can significantly improve overall site authority.
- Plugins: You can leverage WordPress plugins for SEO, analytics, caching, contact forms, A/B testing, and other functionalities directly on your pre-landing pages.
- Convenience: Ultimately, it’s easier to edit, update, and manage all pages from a single platform.
How to Do It:
There are several approaches you can take, depending on how your pre-landing pages were originally created.
Option 1: If Pre-landing Pages are Simple HTML Files
If your pre-landing pages consist of one or more HTML files (index.html, about.html, etc.) and separate CSS/JS, follow these steps:
- Create a New Page in WordPress:
- Log in to your WordPress admin panel.
- Go to Pages > Add New.
- Give the page a relevant title (e.g., “Pre-landing Project X”).
- Copy HTML Code:
- Open your pre-landing HTML file in a text editor (e.g., Notepad++, Sublime Text).
- Copy all the content within the
<body>...</body>tags. - In the WordPress editor, switch to code editing mode (usually a
</>button or a “Text”/”HTML” tab in the classic editor). - Paste the copied HTML code into the editor.
- Copy CSS/JS (if they were separate files):
- CSS: If you had a separate
style.cssfile, you can copy its contents and add it to the “Additional CSS” section in your WordPress theme customizer (usually Appearance > Customize > Additional CSS). For more complex cases, consider creating a custom plugin or using a plugin to add custom CSS/JS on specific pages (e.g., “Insert Headers and Footers”). - JavaScript: Similarly, JS code can be added via plugins or directly into the page’s code if it’s a simple script.
- CSS: If you had a separate
- Configure URL (Slug):
- In WordPress, within the page settings, you can specify the “slug” (URL address). For example, if the page is “Pre-landing Project X”, the slug could be
pre-landing-project-x. This will make it accessible athttps://yoursite.com/pre-landing-project-x/.
- In WordPress, within the page settings, you can specify the “slug” (URL address). For example, if the page is “Pre-landing Project X”, the slug could be
- Save and Test.
Option 2: If Pre-landing Pages Were Built with a Page Builder
If you used a different page builder (e.g., Elementor, Divi) or created pre-landing pages on another platform, the process might be more involved:
- Use a WordPress Page Builder:
- Install the same or a similar page builder on your WordPress site (e.g., Elementor, which is very popular).
- Create a new page in WordPress.
- Open it with the installed page builder.
- Recreate the design and content of your pre-landing page using the builder’s capabilities.
- “From Scratch” or Import: Sometimes page builders have template import/export functions, though this depends on the specific tools. It might be simpler, therefore, to recreate the design manually.
Option 3: Using “Landing Page” Plugins
Specialized WordPress plugins for creating landing pages (e.g., Leadpages, SeedProd, Thrive Architect) offer extensive design, form, and analytics features. This can be a good option, particularly if your pre-landing pages are complex or if you plan many such pages.
What to Consider:
- Design: You might need to adapt the design slightly to look good within your existing WordPress theme.
- Scripts & CSS: Exercise caution when copying external scripts or CSS. Ensure they don’t conflict with your WordPress installation. For smaller pre-landing pages, it’s often best to “inline” CSS and JS directly into the page’s HTML or utilize plugins that add code to the
<head>or before</body>. - URL Structure: It’s always best to have a clear, understandable URL structure, such as
yoursite.com/offer-xoryoursite.com/product-y.
Initially, start with the simplest pre-landing page to understand the process. If they are primarily HTML/CSS, the migration will be relatively easy.
Part 6: WordPress Logo and Site Icon Setup
Adding a professional logo and site icon (favicon) enhances your site’s brand recognition and significantly improves user experience.
Recommended Logo Size for WordPress
There’s no “one” ideal size, as it largely depends on your specific theme and design preferences. However, here are general recommendations:
- For a Standard Header:
- Width: 150px – 300px
- Height: 50px – 100px
- For Retina Displays (HD Quality): Always create the logo at twice the desired display size. For instance, if you aim for a logo to display at 200x80px, you should upload a file of 400x160px. WordPress or your theme will automatically scale it down for regular screens, ensuring it appears sharper on Retina displays.
- File Format:
- PNG: This is the best option because it supports transparency (ideal if your logo has no background).
- SVG: Even better for vector logos, as they scale perfectly without any quality loss on any screen. However, using SVG in WordPress often requires an additional plugin (e.g., “Safe SVG”) due to potential security concerns.
Important: Your WordPress theme usually has its own size recommendations. Therefore, it’s always wise to check its specific settings.
Step-by-Step Logo Installation on a WordPress Site
Most modern WordPress themes allow you to easily upload a logo directly via the Theme Customizer.
Preparing Your Logo File
- First, ensure your logo is saved in
.pngformat (or.svgif you’re using an SVG plugin). - In addition, the file size should be optimized (less than 100-200 KB) to ensure fast site loading.
- Moreover, if you’re creating a 2x logo for Retina displays, don’t be concerned about its large physical dimensions; instead, focus on optimizing the file weight.
Uploading and Configuring the Logo
- Go to the Theme Customizer:
- Log in to your WordPress admin panel.
- In the left-hand menu, navigate to Appearance > Customize.
- The real-time theme customization panel will then open.
- Find Logo Settings:
- In the Customizer’s sidebar, actively look for sections related to the Header, Site Identity, or Logo. Names may vary by theme; for example, you might see “Site Identity,” “Header,” “Theme Options,” or “Layout.”
- In most cases, you’ll find these settings under Site Identity.
- Upload the Logo:
- Within this section, you’ll see an option for “Logo” or “Select Logo.”
- Click the “Select Logo” button to proceed.
- The WordPress media library will open; click “Upload Files” and choose your logo file from your computer.
- After successfully uploading, select it and click “Choose.”
- Crop and Size Settings:
- WordPress may suggest cropping the image. This is usually unnecessary for a logo if you’ve already prepared it to the correct proportions, so you can often skip cropping or adjust as needed.
- Some themes also allow you to adjust the logo’s width and height directly in the Customizer using sliders or numerical fields. Utilize these tools to ensure your logo appears perfect.
- Save Changes:
- Once the logo is uploaded and adjusted, and you are satisfied with its appearance, be sure to click the “Publish” button at the top of the Customizer sidebar to save all your modifications.
- Check:
- Open your site in a new browser window or tab to confirm the logo is displayed correctly. If the image hasn’t updated, clear your browser’s cache (Ctrl+Shift+R or Cmd+Shift+R).
Additionally:
- If your theme provides separate settings for a mobile logo, repeat this process there.
- Some themes support a separate “Site Icon” (Favicon). This is the small icon that appears in the browser tab. It’s typically 512x512px and can also be uploaded in the Site Identity section.
Recommended Site Icon (Favicon) Size
- Optimal Size: 512 x 512 pixels.
- WordPress automatically scales this image to all necessary sizes (16×16, 32×32, 48×48, 192×192, etc.) used by various browsers and devices.
- File Format: PNG.
- This is the best option because it supports transparency, allowing your icon to look good on any background.
Step-by-Step Site Icon Installation in WordPress
The process for installing a site icon is very similar to installing a logo, as it’s also handled via the Theme Customizer.
- Prepare Your Icon File:
- Create an image that is precisely 512×512 pixels.
- Save it in
.pngformat. - Ensure the icon design is simple and clear, as it will be displayed very small. Often, it’s a simplified version of your main logo.
- Optimize the file size (aim for less than 100 KB).
- Go to the Theme Customizer:
- Log in to your WordPress admin panel.
- In the left-hand menu, navigate to Appearance > Customize.
- The real-time theme customization panel will open.
- Find the “Site Identity” Section:
- In the Customizer’s sidebar, as with the logo, locate the “Site Identity” section.
- Upload the Site Icon:
- Scroll down within this section, and you will find the “Site Icon” option.
- Click the “Select Site Icon” button.
- The WordPress media library will open.
- Click “Upload Files” and choose your icon file (the 512x512px PNG) from your computer.
- After uploading, select it and click “Choose.”
- Cropping (if needed):
- WordPress may suggest cropping the image. Since you’ve already prepared it at 512x512px, it should be a perfect square, so you can simply skip cropping by clicking “Skip Cropping”.
- Save Changes:
- After the icon is uploaded, you’ll see a preview within the Customizer.
- Be sure to click the “Publish” button at the top of the Customizer sidebar to save the changes.
- Check:
- Open your site in a new browser window or tab.
- You should then see your icon displayed in the browser tab, next to your site’s title.
- You may need to clear your browser’s cache (Ctrl+Shift+R or Cmd+Shift+R) for it to update.
Now your site will have a professional icon, which ultimately improves its recognition and user convenience!
Part 7: Integrating Custom HTML/CSS Pre-landing Pages into WordPress
To integrate a pre-existing custom HTML page into WordPress, while preserving its functionality and unique design, there are several effective approaches. The best method involves creating it as a custom page template or, alternatively, using a robust landing page plugin.
Approach 1: Creating a Custom WordPress Page Template (Recommended for Full Control)
This method provides full control, allowing you to have this page as a separate file that will completely dictate its appearance, independent of your main WordPress theme.
Requirements: Access to your site’s files via FTP/SFTP or hosting File Manager.
Steps:
- Create a Child Theme (if you don’t have one yet): This is a crucial first step, as it ensures your custom changes won’t be lost when the main theme updates. If you already have a child theme, you can skip this step.
- Create a New Template File:
- Access your hosting’s File Manager (or FTP client).
- Navigate to your active theme’s (or child theme’s) folder:
wp-content/themes/YOUR_CHILD_THEME_FOLDER/. - Create a new file within this folder (e.g.,
page-prelanding-survey.php).
- Insert HTML Code:
- Open the newly created
page-prelanding-survey.phpfile for editing. - Insert all your HTML code into it. (Crucially, ensure you start with the template header as described in relevant WordPress documentation for custom templates).
- Open the newly created
Approach 2: Using a Landing Page Plugin (Easier for Beginners)
This is a simpler option, particularly if you prefer not to work directly with theme files and code.
- Install a Landing Page Plugin:
- Go to Plugins > Add New in your WordPress dashboard.
- Search for popular plugins like “Elementor,” “SeedProd,” “Thrive Architect,” or “Leadpages.” Elementor, for example, offers a very powerful free version.
- Create a New Page with the Plugin:
- After successfully installing and activating your chosen plugin, go to Pages > Add New.
- Give the page a descriptive title.
- Click the “Edit with Elementor” button (or the equivalent for another plugin) to launch the page builder.
- Recreate the Design:
- Inside the page builder interface, you can then utilize its visual tools to recreate your landing page. This involves manually copying CSS styles and HTML structure from your original code, often through a visual drag-and-drop process.
- Insert Custom HTML, CSS, JS:
- Most builders include “HTML” or “Code” widgets where you can insert custom scripts (like Google Analytics) and, potentially, even some HTML sections.
- Custom CSS can usually be inserted into the page builder’s specific settings (e.g., “Custom CSS” panel).
survey.webpimage: Upload this image through the WordPress media library, and then insert it into the page via the builder’s image elements.
Plugin Advantages: This method eliminates the need to work directly with code and offers visual editing capabilities. Disadvantages: It can be challenging to perfectly replicate the design pixel-by-pixel. Furthermore, plugins add their own scripts, which might slightly slow down the page loading speed.
What I would recommend: If you desire an absolutely exact copy of your landing page and possess basic file handling skills, Approach 1 (custom template) will be the best choice, as it provides full control. However, if you’re seeking an easier visual method and are willing to adapt the design slightly, then Elementor is a highly recommended option.
Part 8: Creating a WordPress Child Theme (Crucial for Customization)
Creating a Child Theme is a very important step for any serious WordPress modifications. It uniquely ensures that your custom changes won’t be lost when the main theme (parent theme) updates. We will outline how to do this manually for the best understanding.
Requirements:
- Access to your site’s files via File Manager (e.g., hPanel on Hostinger) or an FTP/SFTP client (e.g., FileZilla).
- Knowledge of your active (parent) theme’s folder name. You can usually find this by navigating to Appearance > Themes in your WordPress admin panel.
Step-by-Step Manual Child Theme Creation
Step 1: Find the Parent Theme’s Folder Name
- Log in to your WordPress admin panel.
- Go to Appearance > Themes.
- Locate your currently active theme.
- Click on it to open its details. In the URL address, or within the theme description, you’ll usually see its folder name.
- Example: If the theme is named “Twenty Twenty-Four”, its folder name will most likely be
twentytwentyfour. Remember this exact name.
- Example: If the theme is named “Twenty Twenty-Four”, its folder name will most likely be
Step 2: Create a New Folder for Your Child Theme
- Open the File Manager in your hPanel (Hostinger).
- Navigate to the directory:
public_html/wp-content/themes/. - In this directory, create a new folder.
- Folder Name: Choose a unique name that clearly indicates it’s a child theme. A good practice is to take the parent theme’s name and append
-child. - Example: If the parent theme is
twentytwentyfour, name the new foldertwentytwentyfour-child.
- Folder Name: Choose a unique name that clearly indicates it’s a child theme. A good practice is to take the parent theme’s name and append
Step 3: Create the style.css File for Your Child Theme
- Go into the newly created folder (
twentytwentyfour-child). - Create a new file inside it named
style.css. - Open this file for editing and paste the following code into it:
/*
 Theme Name:     Twenty Twenty-Four Child
 Theme URI:      https://yoursite.com/
 Description:    A Twenty Twenty-Four Child Theme
 Author:         Your Name
 Author URI:     https://yoursite.com/
 Template:       twentytwentyfour
 Version:        1.0.0
 Text Domain:    twentytwentyfour-child
*/
Explanation and What to Change:
- Theme Name: Crucially, change this to the desired name of your child theme (e.g.,
Your Site Child Theme). - Theme URI: This should be your site’s URL.
- Description: Provide a short description of your child theme.
- Author: Enter your name here.
- Author URI: This should also be your site’s URL.
- Template: THIS IS THE MOST IMPORTANT ITEM! Here, you must specify the EXACT folder name of your parent theme (from Step 1). For example,
twentytwentyfour(without-child). Case sensitivity truly matters here! - Version: Specify the current version of your child theme.
- Text Domain: This should be the folder name of your child theme.
- Save the
style.cssfile.
Step 4: Create the functions.php File for Your Child Theme
- In the same child theme folder (
twentytwentyfour-child), create a new file namedfunctions.php. - Open this file for editing and paste the following code into it:
<?php
/**
 * Twenty Twenty-Four Child Theme functions and definitions
 *
 * @link https://developer.wordpress.org/themes/basics/theme-functions/
 *
 * @package Twenty_Twenty_Four_Child
 */

if ( ! function_exists( 'twentytwentyfour_child_enqueue_styles' ) ) :
    /**
     * Enqueue scripts and styles.
     */
    function twentytwentyfour_child_enqueue_styles() {
        wp_enqueue_style( 'twentytwentyfour-style', get_template_directory_uri() . '/style.css', array(), wp_get_theme()->get('Version') );
        wp_enqueue_style( 'twentytwentyfour-child-style', get_stylesheet_directory_uri() . '/style.css', array( 'twentytwentyfour-style' ), wp_get_theme()->get('Version') );
    }
endif;
add_action( 'wp_enqueue_scripts', 'twentytwentyfour_child_enqueue_styles' );
Explanation and What to Change:
- This code ensures that both the parent theme’s styles and your child theme’s styles are loaded correctly.
- You need to replace
twentytwentyfour(as in the function nametwentytwentyfour_child_enqueue_styles, and inwp_enqueue_styleand@package) with the folder name of your parent theme. This is absolutely vital! (For example, if your parent theme is “astra”, then you would useastra_child_enqueue_styles,astra-style,package Astra_Child). - In addition, replace
Twenty_Twenty_Four_Childwith your child theme’s desired name (using spaces between words and correct casing).
- Save the
functions.phpfile.
Step 5: Activate Your Child Theme
- Log in to your WordPress admin panel.
- Go to Appearance > Themes.
- You should now see your new child theme in the list (with the name you specified in
Theme Nameinstyle.css). - Click the “Activate” button beneath it.
Congratulations! Your site is now running on the child theme. Therefore, any changes you make to the child theme files (e.g., adding a custom template, as we planned) will be preserved, even if the parent theme updates.
If something goes wrong (e.g., the site “breaks” or displays an error), it’s most likely due to an error in the Template: folder name in style.css or within the functions.php code. In such a case, you can use your File Manager to delete or rename the child theme folder to revert the site to the parent theme, and then attempt the process again.
Part 9: Troubleshooting: Child Theme Not Appearing
If your child theme doesn’t show up under Appearance > Themes, it usually indicates a small error in one of the style.css or functions.php files, or in the folder structure itself.
Let’s check the most common reasons step-by-step to diagnose the problem.
Troubleshooting: Why Your Child Theme Isn’t Displaying
1. Checking the Parent Theme’s Folder Name (Template: in style.css)
- This is the most common reason! The name in the
Template:line in yourstyle.cssmust EXACTLY match the folder name of your parent theme (and it is case-sensitive!).- Step 1: Initially, log in to your WordPress admin panel, then go to Appearance > Themes.
- Step 2: Click on your active parent theme (not the child theme, which isn’t showing).
- Step 3: Find the folder name in the URL or within the theme details. For example, if the URL looks like
.../wp-admin/theme-install.php?theme=twentytwentyfour, then the folder name istwentytwentyfour. - Step 4:Now, open your child theme’s
style.cssin the File Manager and carefully check theTemplate:line. It must be identical to the parent theme’s folder name.- Correct Example:
Template: twentytwentyfour(if parent theme folder istwentytwentyfour) - Incorrect Examples:
Template: Twenty Twenty-Four(if folder istwentytwentyfour),Template: twentytwentyfour-main, etc.
- Correct Example:
2. Checking File Location and Names
- Step 1: Access your hosting’s File Manager and navigate to
public_html/wp-content/themes/. - Step 2: Next, ensure your child theme folder (e.g.,
twentytwentyfour-child) is located directly insidethemes/. - Step 3:Also, check inside the child theme folder (
twentytwentyfour-child). There should only be these two files:style.cssfunctions.php
- Step 4: Finally, verify that the file names are spelled exactly like that (
style.cssandfunctions.php), without case errors or extra characters.
3. Checking style.css Syntax
- Step 1: Open your child theme’s
style.css. - Step 2: Ensure all comments (lines starting with
/*and ending with*/) are correct. - Step 3: Make sure each line starts with a key (e.g.,
Theme Name:) and ends with a value, with a colon in between. - Step 4: Here’s an example of a minimal
style.cssthat should work:CSS
/*
 Theme Name:     My Awesome Child Theme
 Template:       twentytwentyfour  <-- Change this to the EXACT folder name of your parent theme
 Version:        1.0.0
*/
4. Checking functions.php Syntax
- Errors in
functions.phpcan lead to a “white screen of death” or prevent the site from working at all. - Ensure the file starts with
<?phpand has no spaces or empty lines before it. - Also, ensure you have correctly changed
twentytwentyfourto your parent theme’s folder name in all places, as shown in the previous instructions.
What to Do if it Still Doesn’t Appear After Checking:
- Clear Hosting and Browser Cache: Sometimes hosting caches files. Clear the cache on Hostinger, then in your browser (Ctrl+Shift+R or Cmd+Shift+R).
- Try Another Browser/Incognito Mode: This is a good way to rule out browser cache issues.
- Check Error Logs: On Hostinger, you can find error logs. If there’s any PHP error, it will be displayed there, and this can pinpoint a problem in
functions.php.